Approving leave
Staff ask for leave on WhatsApp (they send the word leave), by asking the assistant, or HR adds it under Leave requests. Each request goes to one person to decide. They approve or reject it in PiCortex, from the link in their email, or on WhatsApp, and the employee hears the answer.
Who approves a request
PiCortex sends a request to the first of these that is set:
- The branch's approver. The employee's Branch is on their team member page. If that branch has an approver, the request goes to them.
- The leave manager for your business.
- The account owner: the person who created your PiCortex account. If there isn't one, your first Administrator.
Someone who has left is skipped. If an approver has been deleted, or their Employment Status is Terminated, the request goes to the next one on the list. If nobody on the list is still with you, nobody is told. The request still waits under Team Management › Leave requests, where HR, ESD or an Administrator can decide it.
Nobody approves their own leave. If a request would go to the person who asked for it, it goes to the next one on the list, so a leave manager's own request goes to the account owner.
Anyone who is HR, ESD or an Administrator can also approve or reject any request in PiCortex, whoever it was sent to.
Choose who approves
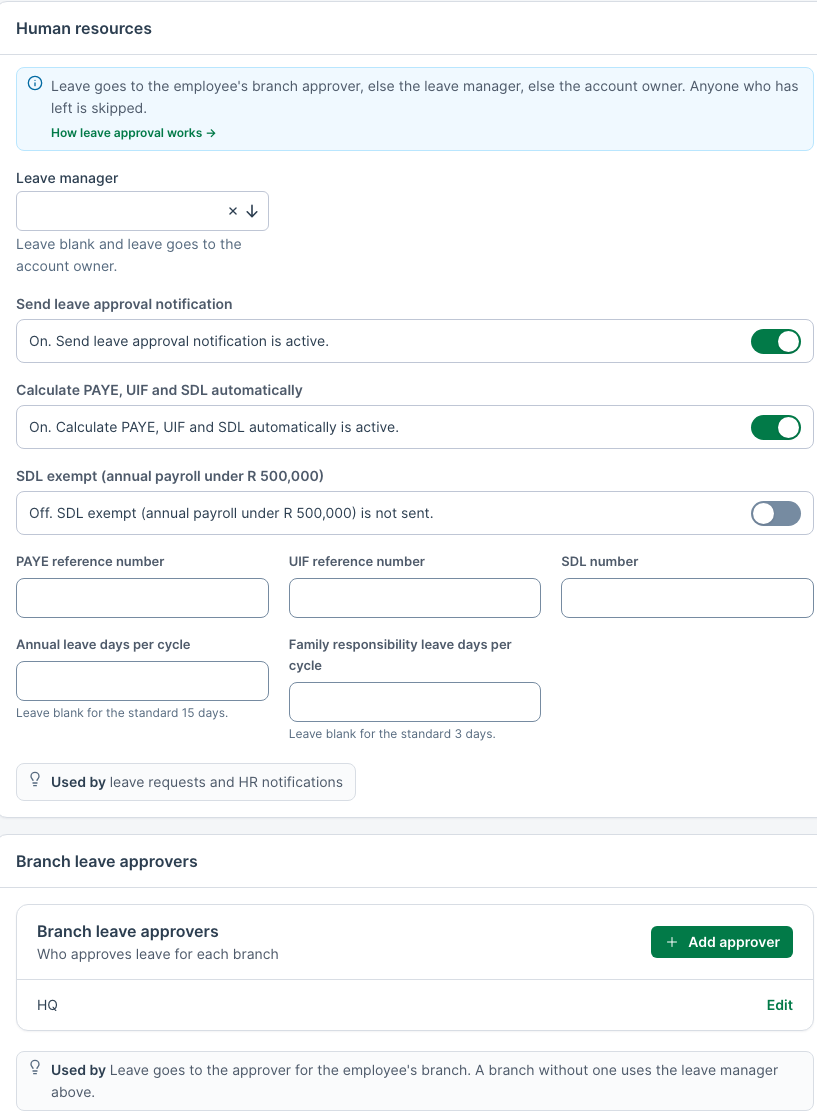
Go to Settings › Team and roles. The Human resources card holds the leave manager, and the Branch leave approvers card holds an approver for each branch.
The leave manager
Only Administrators and ESD can change the leave manager.
- Click the box under Leave manager. Pick Leave manager opens.
- Find the person and click their name.
- Click Save at the bottom of the card.
To clear it, click the × in the box, then Save. A branch with its own approver still sends leave to them. The rest goes to the account owner, as the line under the box says.
An approver for each branch
The card only shows when your business has branches (Team Management › Branches).
- Click Add approver. Add Branch Leave Approver opens.
- Pick the Branch and the Leave Approver.
- Click Create.
To change one, click Edit on its row. A branch without an approver uses the leave manager.
If an approver has left, the page says so on their row, for example "Thabo Mokoena is no longer active, so leave goes to the leave manager, or the account owner if there isn't one." Pick someone else.
Send leave approval notification emails the leave manager when a request is changed after it was made. A new request reaches its approver whether it's on or off.
How the approver is told
When a request comes in, the approver gets:
- a notification in PiCortex (the bell), and on their phone if they have the app;
- an email saying who asked, for which days, with an Approve or decline button;
- a WhatsApp message with Approve and Reject buttons. WhatsApp needs a verified number and WhatsApp switched on for your business.
Each of these follows the approver's How to reach them setting on their team member page, so a way they turned off isn't used. If none of the ways they chose can reach them, every way that can is used instead. See Managing your team.
If your business has an escalation rule for approvals, a request left waiting reaches the approver again, then your escalation contacts. See Escalations.
Approve or reject
In PiCortex
HR, ESD and Administrators can decide any request. The approver a request is waiting on can decide it too, whatever their role.
- Open the request:
- If it's waiting on you: click it in the bell. Your Leave requests list shows only your own leave, so it isn't there. The email and WhatsApp work too (see below).
- HR, ESD and Administrators: click it in the bell, or go to Team Management › Leave requests and click it.
- Read the Leave balances card on its Details tab (see below). Only HR, ESD and Administrators see the figures. Anyone else sees, for example, "Only HR and administrators can see Thandi Mokoena’s leave balances."
- Click More, then Approve.
To reject it:
- Click More, then Reject. Reject leave opens.
- Pick a Reason, such as Not enough leave days left or Not enough notice given.
- Add a Note if you want to say more. With Other, the note is required. The employee sees it.
- Click Reject leave.
Approve and Reject only show on a request that is still pending.
From the email
Every approver can decide from the email or on WhatsApp. An approver who isn't HR, ESD or an Administrator can open the request from the bell too, without the employee's leave balances. Once it's decided, it closes to them: opening it again says This leave request isn’t waiting on you.
- Click Approve or decline in the email. A page opens with the request, for example Leave 10031 — Thandi Mokoena. It needs no login.
- Check your name under Your name.
- Click Approve. Or click Reject, say why under Why are you rejecting it?, and click Send rejection. A rejection always needs a reason.
On WhatsApp
Tap Approve or Reject on the message. After Reject, PiCortex asks why: reply with your reason. You can also type it in one go, for example "Reject we're short-staffed that week".
What the employee hears
Once it's decided, the employee gets a notification and an email saying their leave was approved or declined, with your reason if it was declined. They get a WhatsApp too if their number is verified. Their balances update straight away: approved days move to Taken, and rejected days come off Pending.
The leave balances on a request
Each leave request has a Leave balances card on its Details tab, so you can see what approving it leaves without looking anything up. HR, ESD and Administrators see the figures; an approver in another role sees who can.
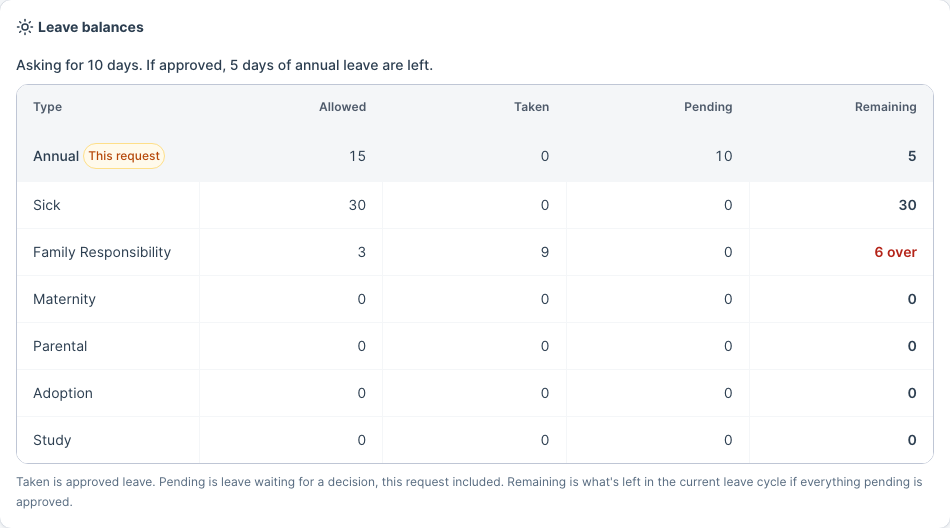
- The line at the top says what approving it means, for example "Asking for 10 days. If approved, 5 days of annual leave are left." If they're asking for more than they have, it says so in red: "Asking for 5 days. That's 2 days more annual leave than they have left."
- Each kind of leave has a row. The kind asked for comes first, marked This request (amber while it's pending).
- Allowed is the days they get this leave cycle, plus any adjustment. Annual and family responsibility leave start from the days per cycle on the Human resources card: 15 and 3 unless you change them.
- Taken is approved leave.
- Pending is leave waiting for a decision, this request included.
- Remaining is what's left in the current leave cycle if everything pending is approved. 6 over means they'd be 6 days past what they're allowed.
The figures count the current leave cycle only. If a request's dates are outside it, such as leave next year, it isn't in the figures and isn't marked. The line at the top says so instead, for example "Asking for 4 days after this leave cycle ends on 28 Feb 2027, so they're not in the figures below."
The same balances show when you add leave for someone: click Add leave on Leave requests and pick the Staff member.