Document templates
Settings → Document templates holds two things:
- Defaults for new documents: which built-in design your invoices and quotations use.
- Your templates: documents you write yourself in Word or Excel, such as an employment contract, a client's site acceptance form or a client's survey report. PiCortex fills them in from a record and saves the result as a PDF on that record. An Excel template also saves the filled workbook.
Only administrators can add or download templates. Anyone who can open a team member or a job can generate a document from one.
An activation report is the one template that is a PowerPoint deck, not a Word document: see Activation report templates below.
Writing a template
Write the document in Word as you want it to look, letterhead included. Where a detail from the record should go, type its name in double curly brackets:
This contract is between {{ClientName}} and {{name}}, who starts as {{jobTitle}} on {{dateStarted}}.
Save it as a Word document (.docx). Older .doc files need saving as .docx first. To use a client's Excel workbook instead, see Excel templates.
What you can put in a template
For a team member
| Placeholder | What it prints |
|---|---|
{{name}} | Their full name |
{{employeeNumber}} | Employee number |
{{jobTitle}} | Job title |
{{dateStarted}}, {{endDate}} | Start and end dates |
{{idNumber}} | ID number |
{{email}}, {{mobile}} | Contact details |
{{rate}}, {{paymentPeriod}} | Pay rate and how often it is paid |
{{bankName}}, {{bankAccountName}}, {{bankAccountNumber}} | Bank details |
For a job
| Placeholder | What it prints |
|---|---|
{{number}}, {{title}}, {{description}} | The job's number, title and description |
{{date}}, {{deadline}}, {{status}} | Dates and status |
{{customer.name}} | The customer's name. Any customer detail works the same way. |
{{location}} | Where the job is |
{{TaskCount}}, {{TasksDone}} | How many tasks, and how many are done |
{{Photo1:W:300}}, {{Photo2:W:300}}… | The job's photos, in the order they were added, 300 points wide |
{{Assignees}} | Everyone on the job, separated by commas |
{{SiteAddress}}, {{SiteLatitude}}, {{SiteLongitude}} | Where the work was done: the site's address and coordinates, or the job's own location when the site has none |
{{Task1Photo1:W:240}}, {{Task1Photo2:W:240}}… | The photos on task 1, then task 2 ({{Task2Photo1:W:240}}) and so on. Use them for the evidence under each test step |
{{Photo1TakenAt}}, {{Photo1Location}}… | When and where photo 1 was taken, if it was taken with the PiCortex app's camera. The location reads like -26.20410, 28.04731 and is blank when the person didn't allow location |
{{Task1Photo1TakenAt}}, {{Task1Photo1Location}}… | The same for the photos on each task |
{{requisition.number}}, {{requisition.clientPONumber}} | The job's linked sales order: its number, and the customer's PO number on it. When the order has no PO number, {{requisition.clientPONumber}} prints the order's Subject. Any sales order detail works the same way |
{{acceptedAt}}, {{acceptedBy}} | When the job was accepted, and which team member recorded it. They are filled on documents generated after the sign-off; on the document being signed, use {{SignedAt}}. See Job sign-off |
A table row with {{Tasks}{Title}}, {{Tasks}{Status}} and {{Tasks}{Assignee}} in its cells repeats once for every task on the job. {{Tasks}{Idx}} numbers the rows. A task row can also show:
| In a task row | What it prints |
|---|---|
{{Tasks}{StatusLabel}} | The status as you see it on screen, such as "Completed" |
{{Tasks}{Result}} | Pass for a completed task, Pending for anything else. Handy for a test procedure (ATP), where each task is a test step |
{{Tasks}{Successful}} | Yes for a completed task, No for a blocked one, N/A when it doesn't apply, and blank when it hasn't been done yet |
{{Tasks}{Notes}} | The task's description |
{{Tasks}{Date}}, {{Tasks}{Deadline}}, {{Tasks}{Finished}} | When the task was due to start, its deadline, and when it was finished |
{{Tasks}{PhotoCount}} | How many photos the task has |
The job's assets work the same way. A table row with {{Assets}{Model}}, {{Assets}{SerialNumber}} and {{Assets}{MacAddress}} repeats once for every customer asset on the job, such as the router installed. {{Assets}{Description}}, {{Assets}{Make}} and {{Assets}{Location}} work too, and {{AssetCount}} says how many there are.
Photos can't go inside a table row. Put each step's photos below the table, with {{Task1Photo1:W:240}} and so on, each in a paragraph of its own.
On every document
| Placeholder | What it prints |
|---|---|
{{ClientName}} | Your business name |
{{TemplateName}}, {{TemplateVersion}} | Which template, and which version, produced the document |
{{GeneratedAt}} | When it was generated, in your time zone |
{{Signature:W:180}} | A signature captured when the document is generated, 180 points wide |
{{SignedAt}} | When that signature was captured |
{{SignedByName}}, {{SignedByDesignation}} | The name and designation typed in with that signature |
{{InstallerSignature:W:180}} | The installer's signature, when they sign too. It prints only: it doesn't mark a job accepted |
{{InstallerName}}, {{InstallerDesignation}}, {{InstallerSignedAt}} | The installer's name, designation, and when they signed |
A form filed on the job. When a form is filed on a job, such as a site survey, a job template can print its answers: {{Form.site_survey.roomType}} prints the answer to the question roomType on the form site_survey. The answers come from the latest response submitted to that form on the job. A choice prints the option chosen, and a photo or signature question prints the picture, so give it a paragraph of its own and a size, such as {{Form.site_survey.frontPhoto:W:240}}. A question that takes several photos numbers the rest: {{Form.site_survey.frontPhoto.2:W:240}}. {{Form.site_survey.SubmittedAt}} prints when it was submitted. A question nobody answered prints blank. Ask PiCortex for a form's question names.
A Word template that prints a form's answers is a report filled on site, so generating it also saves the filled Word file beside the PDF, ready to send to a client who wants the report in Word.
Your own fields. If your business has fields of its own on jobs (set up for you by PiCortex, such as a solution ID or a service plan), each prints by its field name, for example {{solutionId}}.
A placeholder with nothing to print, such as a photo the job doesn't have, is left blank.
Cost never prints for a customer. On a quotation, sales order, invoice or credit note, cost placeholders print blank, whatever the template asks for. That covers unit cost, total cost, purchase price, markup, margin, gross profit and commission. Internal documents, such as a job card, still print them.
Put each image placeholder in a paragraph of its own (press Enter before and after it). A signature or a photo replaces the whole paragraph it is typed in, so a label such as "Signed:" belongs in the paragraph above it. A line break made with Shift+Enter stays in the same paragraph, so it doesn't protect the label. Change the number after :W: to set the image's width, or use :H: to set its height instead.
Excel templates
A client's own report is often an Excel workbook: a survey sheet, a test sheet, a certificate. Use the workbook itself as the template, so the client gets back exactly the file they gave you, with its sheets, layout, logos and dropdown lists.
- Type placeholders into the cells, the same way as in Word:
{{customer.name}},{{solutionId}},{{Form.site_survey.roomType}}. A cell can mix text and placeholders, such asSolution ID: {{solutionId}}. - For a photo or a signature, type its placeholder alone in the box it should fill (a single cell or merged cells), such as
{{Form.site_survey.frontPhoto}}. The picture is sized to fit the box and keeps its shape, so there's no:W:to set. - Answers always go in as text, never as formulas. The workbook's own formulas still work.
- Repeating rows (
{{Tasks}{…}}) are for Word only.
Generating an Excel template saves two files under the record's Files tab: the filled workbook (.xlsx) and a PDF of it.
Adding a template
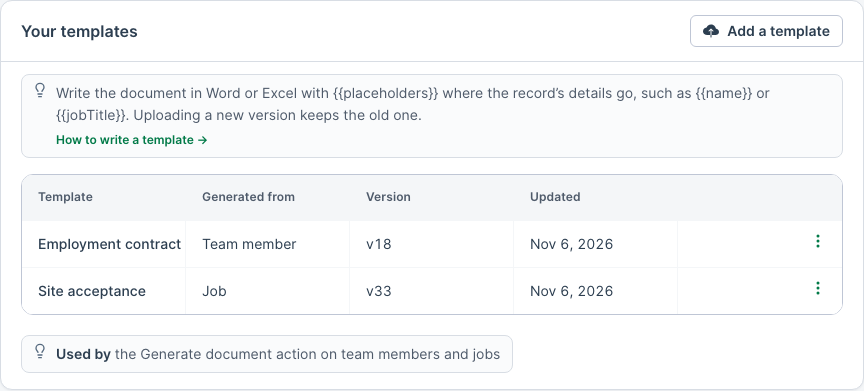
- Open Settings → Document templates.
- Under Your templates, click Add a template.
- Give it a name, choose whether it is generated from a Team member or a Job, and choose what kind of document it is. If none of the kinds fits, choose Other and say what it is, such as "Leave application".
- Choose the Word or Excel file and click Upload template.
Activation report templates
For an events business, an Activation report template is your client's PowerPoint deck (.pptx). Other businesses can still upload a Word activation report, which generates like any other Word template. PiCortex keeps its slides, fills in its placeholders, and adds the report's slides on the deck's own layouts. See Activation reports for what goes in.
- Click Add a template, choose Job and the kind Activation report.
- Choose the Client product it is for. Leave it on Any product (default) for the template every event uses. Choose a product only when a client wants its own deck: that product's events use it instead of the default.
- Choose the PowerPoint file and click Upload template.
In the deck:
- Type placeholders in any text box or table, in double curly brackets:
{{EventTitle}},{{EventNumber}},{{Client}},{{ClientProduct}},{{Region}},{{BusinessUnit}},{{Venue}},{{EventDate}},{{EventDates}},{{ExpectedAttendees}},{{Brief}},{{Summary}},{{Rostered}},{{Present}},{{NoShows}},{{HoursWorked}},{{SignUps}},{{Spend}},{{Committed}},{{Remaining}}and{{Budget}}(the last four blank for anyone who can't see the event's budget).*Project Name*on a cover is read as the event's title. - Date boxes on your slides show the event's date.
- The report's own slides go in before your deck's last slide (usually "Thank you"). They use your deck's Title Only layout, so give the deck a branded Title Only layout (in PowerPoint, View → Slide Master) and the report's slides carry your client's look.
Changing a template
Click New version beside the template and upload the edited file. A new version has to be the same kind of file: Word for Word, Excel for Excel. The new version is used from then on.
The old version is kept, not replaced. Every document PiCortex generates records which template and which version produced it, so you can always open the exact wording a contract was signed under. Click Versions to see every version and download any of them.
Generating a document
- Open the team member or the job.
- Click Perform actions, then Generate document.
- Choose the template.
- To sign it there and then, turn on Sign it now and sign in the box. The signature goes where the template has
{{Signature:W:180}}. Type the signer's name and designation underneath if the document prints them. - If the installer signs too, turn on The installer signs too, sign in that box and type their name and designation. Left empty, your own name is used. Only the customer's signature marks a job accepted.
- Click Generate.
The PDF is saved under the record's Files tab, with the filled workbook beside it for an Excel template, and the filled Word file beside it for a Word template that prints a form's answers. Generating again creates a new file; it never overwrites one generated earlier.