Checklists and job templates
A job template is a list of tasks you start a job from, so nobody types the same tasks twice. On an events business it's called a checklist, such as your Activation checklist, and you start an event from it.
Where to find them
- On an events business: Operations › Checklists, after Events.
- On any other business: Operations › Job Templates, after Jobs.
Administrators and ESD can add, change and delete them. Finance, Dispatch and Technicians can see them.
The steps below use the events words. On other businesses the buttons say job template instead of checklist, for example Add job template.
Make a checklist
- Go to Operations › Checklists and click Add checklist.
- Type a Name, for example Launch checklist. Add a Description if you want.
- Turn Active on. Only active checklists are offered when you start an event.
- Under Tasks, click Add Item. Add task opens. It doesn't ask which checklist the task is on: it's the one you're making.
- Type the task's Title, fill in the rest (see What a task holds) and click Add. The task goes at the end of the list.
- Repeat for each task, then click Create.
Change, reorder or remove tasks
- Open the checklist, click More, then Edit.
- Under Tasks, each task has:
- an up and a down arrow, to move it up or down the list;
- Edit, to change it;
- Remove, to take it off.
- Click Add Item to add a task at the end.
- Click Save.
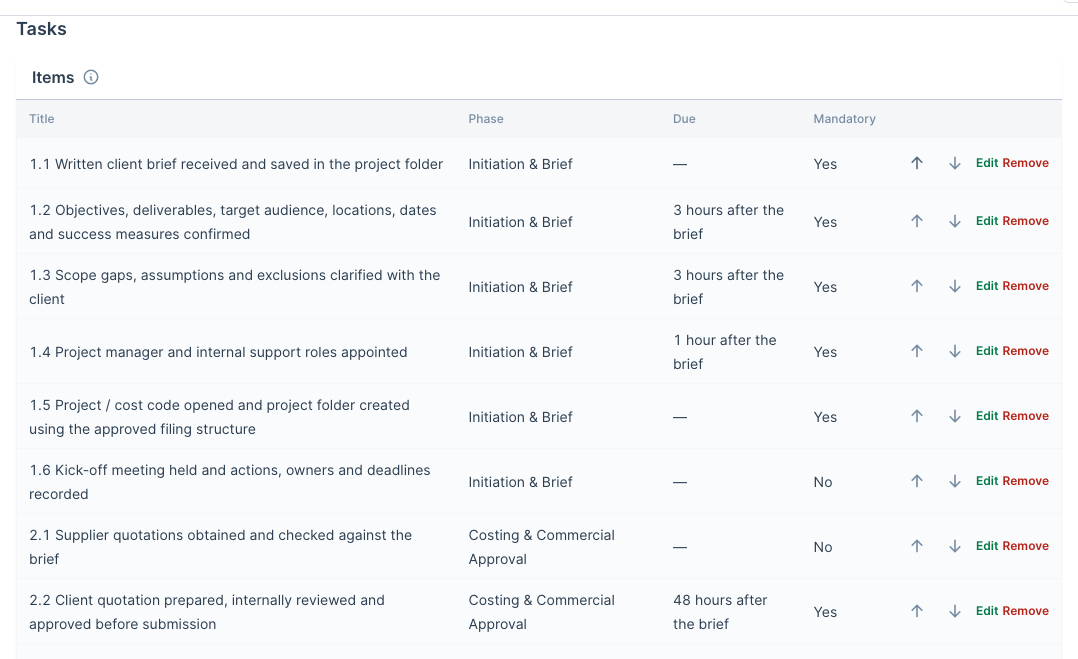
The list is saved in the order you see, so use the arrows to put a task in its place.
Changes apply to events started after you save. An event that already has the checklist keeps the tasks it was given, so change those on the event itself.
To stop offering a checklist without deleting it, edit it and turn Active off. More › Delete deletes it, and that can't be undone.
What a task holds
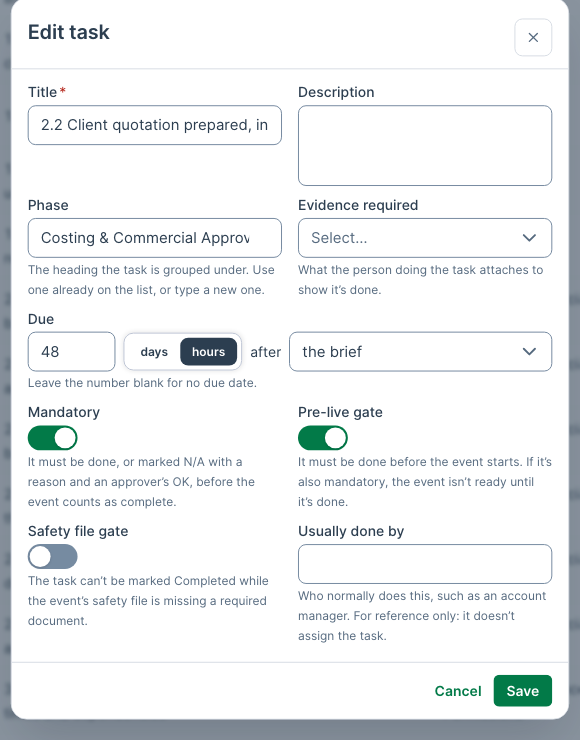
- Title: what to do, for example 2.2 Client quotation prepared, internally reviewed and approved before submission.
- Phase: the group the task is listed under on the event, such as Costing & Commercial Approval. As you type, the phases already on the checklist are offered: pick one so the task joins that group.
- Evidence required: the proof the task asks for: None, Photo, Voice, File or Screenshot.
- Due: when the task is due, as a sentence. 48, hours, after the brief means 48 hours after the brief was received. 72, hours, before the event is three days before the event. Leave the number blank for no due date.
- Mandatory, Pre-live gate and Safety file gate: see below.
- Usually done by: who would normally do it. It's a note for whoever assigns the task, not a rule.
Other businesses see the job template words: Evidence Required, Pre-Live Gate, Safety File Gate and Assignee Role, and their tasks are due a number of days or hours after the job starts or before the job starts.
Mandatory items and pre-live gates
- Mandatory: the task has to be done, or marked N/A with a reason and an approval.
- Pre-live gate: the task belongs before the event goes live.
- What holds an event up: only a task with both on, a required gate. The event's Checklist section reads Not ready to execute while any required gate is open, for example 11 required gates are still open. A gate is closed when it's Completed, or N/A with the approval it needs. A pre-live gate that isn't mandatory is counted once the required ones are closed, but never holds the event up. A mandatory task that isn't a gate doesn't either.
- Safety File Gate: the task can't be marked Completed while the event's safety file is missing a document. This one also applies to events already started from the checklist.
A mandatory item or pre-live gate that is late or blocked can escalate to the person it's assigned to, then your escalation contacts. See Escalations.
Start an event or a job from a checklist
- Open the event. An event with no checklist and no tasks opens its Checklist section on the list of checklists. On an event or job that already has tasks, click ⋮ on its Tasks section, then Start a checklist. On a job with no tasks, click Start from a checklist beside the add row.
- Pick a checklist, for example Activation checklist · 72 tasks. Each shows its description.
- Click Add checklist.
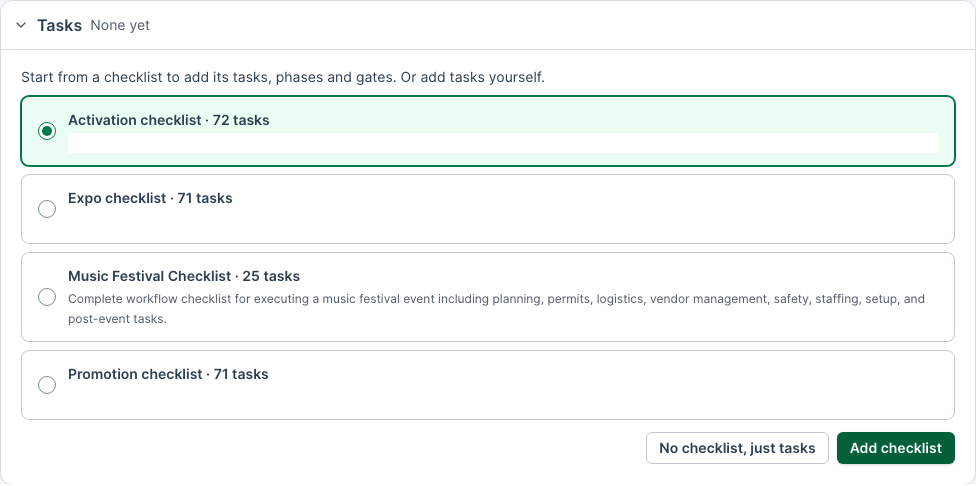
Its tasks are added, grouped by phase, with due dates counted from the brief and the event date. The section then shows whether the event is ready to execute. On a job, a gate reads Before work starts and the section says Ready to start work or Not ready to start. See Your event page.
Don't want one on an empty event? Click No checklist, just tasks. Starting a checklist is only offered while there is none, and only to someone who can edit the event or job.
Remove a checklist from an event
If you started an event from the wrong checklist, or don't need one, you can take it off. You need to be able to edit the event.
- Open the event from Events. On the Details tab, click ⋮ on the Checklist section, then Remove checklist.
- PiCortex asks what should happen to the checklist's tasks. Choose one:
- Keep all … tasks (the default): nothing is deleted. They stay as ordinary tasks, with their status, people, dates, notes and files; each keeps its phase as a label. Click Remove checklist, keep tasks.
- Keep the … with progress, remove … not started, shown when someone has worked on some of them: the ones nobody has started are deleted. Click Remove checklist and 72 tasks (the button counts them).
- Remove all … tasks deletes them all. Click Remove checklist and all tasks.
- PiCortex says what it did, for example Checklist removed. 72 tasks kept as plain tasks. or 72 tasks deleted, 3 kept. The event's Changes tab records it.
A checklist task counts as worked on when any of these is true:
- it has been started (its status isn't Not started), or has progress;
- it has been marked N/A, or an N/A was approved;
- it has been decided (approved or rejected);
- it has notes, comments, files, subtasks or appointments;
- someone logged time or stock used against it.
Tasks you added to the event yourself are never deleted. Deleted tasks can't be brought back.
Who can delete everything: anyone who can edit the event can keep the tasks or delete the untouched ones. Delete every checklist task also needs permission to delete tasks: on the standard roles, Administrators and ESD. Your business can change who may delete. Without it, that choice is greyed out and the window says why.
Kept tasks are no longer the checklist's, so the event reads as having no checklist afterwards, and Start a checklist is offered again from the ⋮ menu.
Start a job from a job template
On other businesses, open the job template, click More, then Create Job. Pick the Customer and the Date, and a Site and Team Member if you want, then click Create Job. The job gets the template's tasks.
You can also make jobs from a sales order, each with its template's tasks. See Creating sales orders.