Your event page: quotes, purchase orders and invoices in one place
If your business runs events (activations, promotions, expos), PiCortex calls your jobs Events. Each event's page holds everything raised for it, so you don't have to hunt across Sales and Purchases to see where it stands.
What's on an event
Open an event from Events. Next to Details, the tabs are:
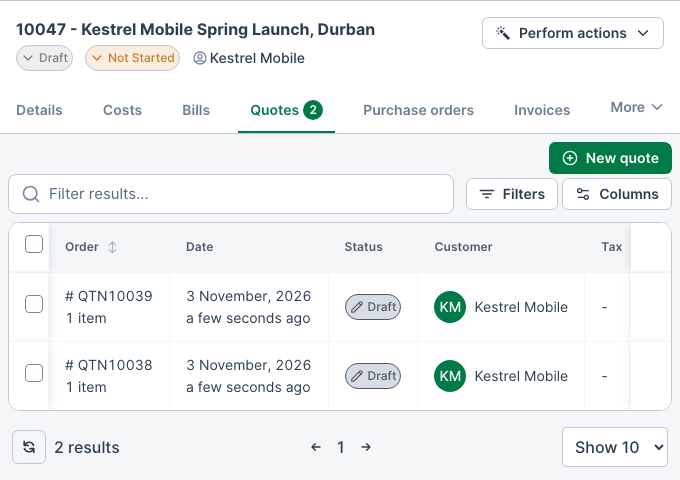
- Quotes: every quote raised for this event, including revisions and alternatives, with its status and total. Click one to open it.
- Purchase orders: what you've ordered from suppliers for this event, at cost, and whether it's been received. You need permission to see costs to view this tab.
- Invoices: what you've invoiced the client for this event, including invoices created from one of its quotes.
- Promoters: who is rostered on the event, and whether they turned up. See Rostering promoters below.
- Bills, Costs, Time logs, Appointments, Form responses, Files, Notes and Changes, as on any job.
A tab that holds records shows how many.
Start a quote from the event
Choose Perform actions → New quote, or click New quote on the Quotes tab. The quote form opens with the event's client already picked. When you save, the quote is linked to the event and appears on its Quotes tab.
Need a revised quote? Create another one from the event. Both stay on the event, so you can compare them.
When you create an invoice from one of the event's quotes, the invoice is linked to the event too.
Quoted against spent
The Costs tab puts the event's accepted quote next to what the event has cost so far. The quoted sell is without VAT. The quoted cost, and the purchase orders and bills in what the event has cost, are without VAT if your business is registered for VAT, and include your suppliers' VAT if it isn't:
- Quoted sell, Quoted cost and Quoted margin: what the accepted quote was for.
- Committed, not yet spent: purchase orders not yet billed, and draft bills.
- Spent: approved bills, items used, expenses and hours worked, and received orders with no bill yet.
- Margin if it ends here: what the quoted sell leaves once everything committed and spent is paid.
A badge says how far over or under the quoted cost the event is. If some of the quote's lines have no cost, the quoted cost says how many, and there's no over or under until they do. Before a quote is accepted, the card says No accepted quote yet.
You need permission to see costs to view this tab.
Spend against the budget
The event's Details show its Budget and how much of it is used, from the same figures as the Costs tab. Purchase orders and bills count without VAT if your business is registered for VAT, since you claim your suppliers' VAT back. If it isn't, they count with the supplier's VAT, because that VAT is part of what you pay. The event's own items, expenses and hours count as you entered them. Set this with Registered for VAT under Settings › Business (see Your business record):
- Budget used %: committed plus spent, as a share of the budget. It moves as soon as a purchase order is raised, so you see the money promised before the bill arrives.
- Committed: purchase orders not yet billed, and draft bills.
- Spent: approved bills, the event's items, expenses and hours, and received orders with no bill yet.
- Remaining: the budget less committed and spent. It shows in red once the event goes over.
When a supplier's bill for an order is approved, its amount moves from Committed to Spent, so Budget used % and Remaining stay the same.
The activation report's spend slide shows the same Committed, Spent and Remaining, to the same people, broken down by purchase-order category, bills, hours, items and expenses.
The budget spreadsheet (below) is different: it is the costing you send your client, so it lists the event's purchase orders and leaves out its bills, hours and expenses.
Order what the event needs
On the Purchase orders tab, click Create Purchase Order. The order is linked to the event.
Generate the budget
Once the event's purchase orders are in, turn them into a budget for your client.
- On the event, click Perform actions, then Generate Budget Document.
- Fill in what applies, and leave the rest blank:
- Management Fee (%): your fee, as a percentage of the subtotal. Leave it blank for no fee.
- Contingency Amount: a fixed amount added before VAT.
- VAT (%): blank means 15%.
- Terms & Conditions: printed at the end. Leave it blank for none.
- Click Generate Budget Document.
The budget is a spreadsheet (XLSX), attached to the event under Files. It lists every line of the event's purchase orders at its cost, grouped by product category, with a subtotal for each. Then come the budget summary, the management fee, contingency, VAT and the grand total, and a place for your client to sign.
Make the activation report
After the event, click Perform actions, then Activation report. It uses your client product's PowerPoint template and adds the event's overview, team and attendance, sign-ups, spend against budget, your summary and photos. The deck is saved under Files. See Activation reports.
Your checklist and Ready to execute
An event can start from a checklist, such as your Activation checklist. On the event's Details tab, click Start from a checklist, pick one and click Add checklist. Its tasks are added to the event, grouped by phase.
- Mandatory items have to be done, or marked N/A with an approval.
- Pre-live gates have to be closed before the event can go live.
- Some tasks come with a due date. Deadlines like "quote within 48 hours" count from when the brief was received, and the readiness review counts back from the event date.
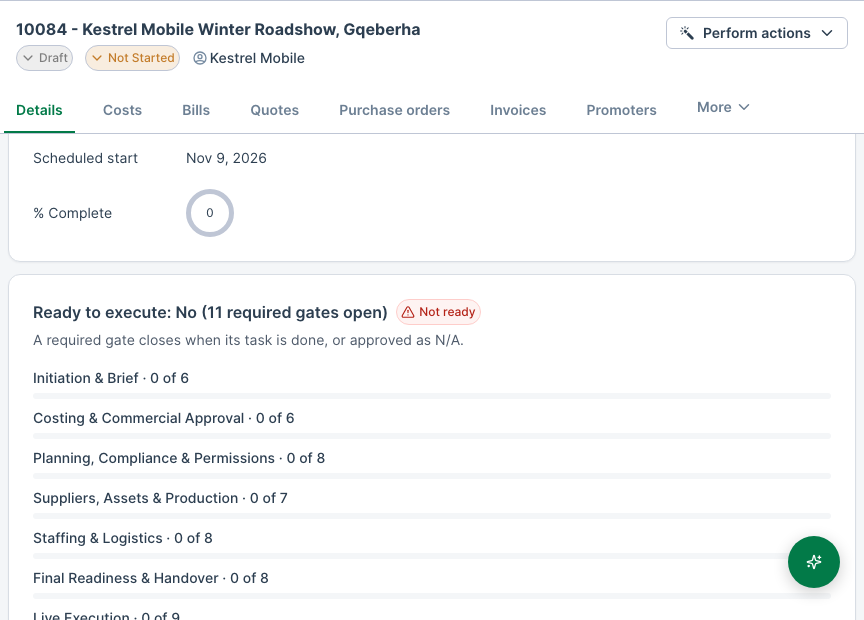
The card above the tasks answers Ready to execute. The event is ready when every required pre-live gate is closed: one that is mandatory. Until then it reads, for example, Ready to execute: No (11 required gates open). Gates marked If Applicable don't count, because they only matter on events that need them. Once every required gate is closed, the card says how many of those optional gates are still open. It also shows each phase's progress and lists anything overdue.
When a task doesn't apply
Change the task's status to N/A and say why. On a mandatory item, an N/A needs approving by an Administrator, or by someone in ESD, Finance or Dispatch. If one of them marks it N/A, it's approved there and then. Otherwise the task shows N/A awaiting approval, and the gate stays open until one of them clicks Approve N/A.
Use Blocked when something is holding a task up, so the team can see it.
When a gate is late or blocked
If your business has escalation rules for gates, a mandatory item or pre-live gate that passes its due date, or is set to Blocked, reaches the person it's assigned to (or the event's manager), then your escalation contact, until it's done. A blocked gate can go straight away, at any hour. See Escalations.
The safety file
Your business can list the safety documents each type of event needs, such as a risk assessment, an emergency plan and public liability insurance. When an event's type needs any, a Safety file card shows on its Details tab, under Ready to execute. It lists each document as Attached, N/A or Missing, and says in plain words what is still missing.
To add a document to the safety file:
- Upload it on the event's Files tab, as you would any file.
- On Details, find the document in the Safety file card and click Attach a file.
- Pick the file and click Attach.
If a document doesn't apply to this event, click Mark N/A and say why. You can't mark one N/A without a reason. Undo N/A puts it back on the list, and Remove takes a file off it (the file stays on the event).
The safety file is complete when every document is attached or marked N/A. Until then, the checklist's safety check (on an Activation checklist, 6.8 Safety 360 check) can't be marked Completed: PiCortex says which documents are missing. The check can still be marked N/A with an approval, like any mandatory item. If it passes its due date while documents are missing, it escalates like any other late gate.
Anyone who can edit events, or who is working on this event, can attach documents and mark them N/A.
Choosing which documents each type of event needs
An Administrator or ESD sets the list in Settings › Lists › Safety File Documents. Each document has a name, what counts (shown on the event), and the Event type that needs it. Leave the event type blank for a document every event needs. Untick Active to stop asking for one.
Rostering promoters
The Promoters tab is the event's roster. Click Add shifts, pick promoters from your approved pool, tick the days and give the start and end times. One shift is added per promoter per day, and promoters who gave an email address are sent their times. A shift that ends at or before its start runs past midnight.
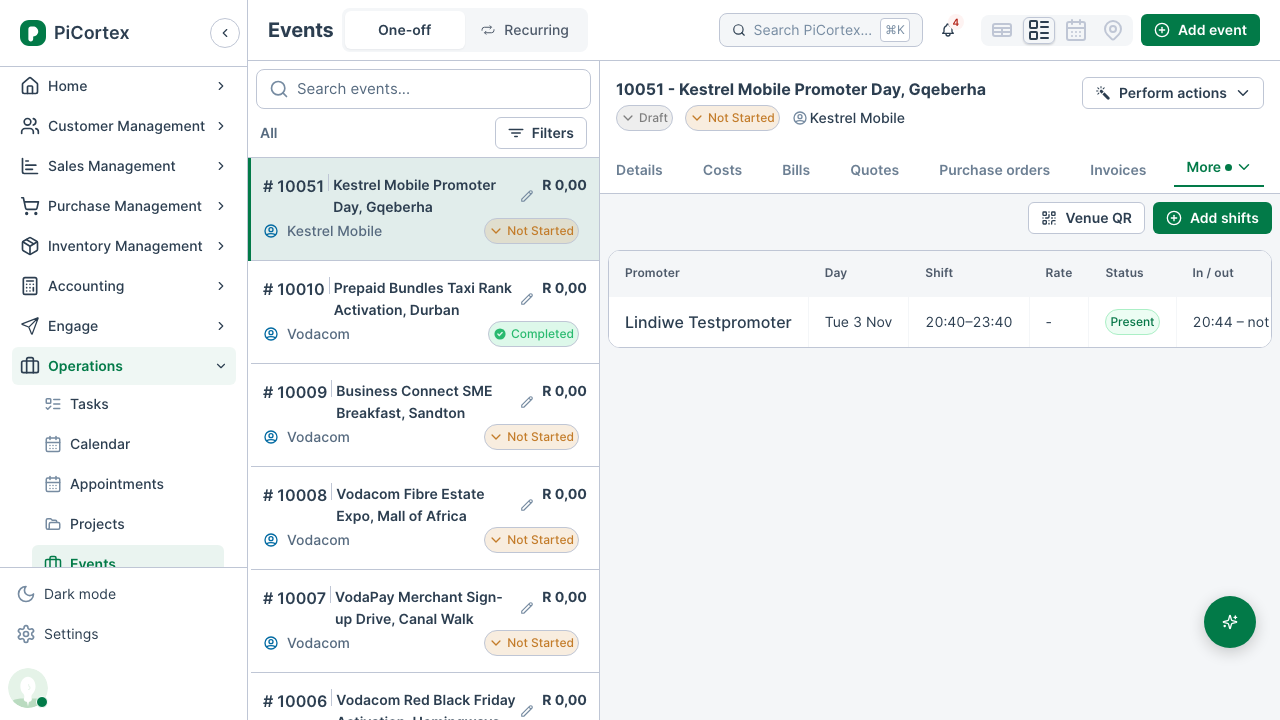
Each shift shows its status:
- Upcoming: it hasn't started yet.
- Present: they checked in on time.
- Late: they checked in after the start's grace period (15 minutes unless your business has a different one).
- No-show: the grace period has passed and they haven't checked in.
The roster also shows when they checked in and out, and their proof: a pin for their location, a camera for their selfie. Promoters who checked in without a shift are listed below it. Only Administrators, HR, ESD and Finance see the hourly rates.
To set up the QR they check in with, see Promoters checking in at an event.